
As your organic reach on social media decreases with each passing day, it is never more important to have a solid email list. For me, the biggest struggle in maintaining an email list is finding the time. I’ve solved that problem with an RSS automation through MailChimp.
Before setting up this automation, be sure you have a solid welcome sequence in place so that your readers know what to expect from you. You can use previous blog content to help write your copy for those emails, heavily relying on things like your core values and mission.
It’s okay if you don’t have a huge audience (or any audience). I find that it’s easier to plug your email list when you already have some established content that will provide value to the reader ready to go. It eliminates the anxiety of asking for an email with nothing set to share.
Locate Your RSS Feed
Many websites automatically generate an RSS feed for you. The most common place is at sitename.com/feed or sitename.com/blog/feed. It SHOULD look like a bunch of code on a page (unless you’re using a browser with a feed reader or an extension to interpret the feed).
If your feed has not been created by default, then you may need to initiate or generate that, or your website may have a custom feed address. Here are the details for most common providers. If you have a custom-built site, contact your web developer for more information.
RSS for WordPress
RSS for Squarespace
RSS for Wix
RSS for Shopify
RSS for Showit
RSS for Weebly
Get Started with MailChimp
If you don’t already have a MailChimp account, go ahead and create one. It’s very simple, and you can start with the free account (I still use a free account, even after several years). Once your account has been created, you will want to start a new campaign. Click the gray “Create Campaign” button in the upper right.
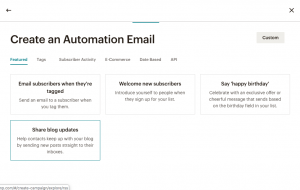
We are creating an email campaign, so select that on the next page, then select ‘automated’ from the center menu. We’re creating a campaign that will send automatically, without any initiation or work from this point on. From here, select “Send Blog Updates.”
This is where you will need to start making some choices. Title your campaign (if you have a lot of campaigns, I recommend using RSS Blog Title for easy reference) and select your audience. Decide how often you would like to contact your readers. I am not a frequent blogger, so I am fine with sending a campaign with every blog post. If you post more than once each week, you may want to send a weekly summary rather than an email with each post, as to not overwhelm your readers.
I do select to resize photos and to auto-convert video (next page). I also edit the email subject to be:
*|RSSITEM:TITLE|*
This will make the subject of each email whatever you title your post as. When writing your post, keep this in mind and craft a title that works well for both the blog post and email subject.
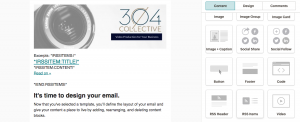
Design Your Email
This is where things get just a little tricky. Select an email template. Keep it basic: most of the information for each email will be auto-populated from your feed. Everything else will repeat in each email you send.
Under your design options, you will need to insert RSS items (scroll down to the bottom).
I do not add an RSS header, as that info will already be in my email subject heading. I created this custom email header for free in Canva. If you’re not a graphic designer and aren’t proficient in PhotoShop, then Canva is a great tool to use!
This is where it is helpful to have a basic understanding of MailChimp’s RSS merge tags, so that you can edit the codes you would like to use in your email.
I will be honest and say that I struggled to create a design that I was happy with using the RSS codes and other design items from MailChimp. In the end, I purchased a template from Etsy and uploaded it to the ‘code your own’ template. To do this, you do need to have a basic understanding of HTML code so that you can edit the stock template with your own colors, fonts and images. If you aren’t at least a little familiar, then I recommend you stick with a stock MailChimp template and simply add your tags from there.
Test and Send
Send text emails to yourself to be sure that everything displays the way you want it to in the reader’s inbox, and set your campaign to send. Done! Now every time you publish a new blog, your subscribers will receive that content in their inbox, without you having to do another thing.
Help with Your RSS Newsletter Automation
If you need more help with your RSS newsletter automation, schedule a one on one session with me! We’ll sit down and make it happen. Whether it’s in person or over a video chat, I’m happy to help you get this framework in place to keep you in touch with your readers. Start the process by filling out my contact form (select Mentoring Services) and we’ll get to work!
Other options to connect and get some help are to join our local Rising Tide Society! We meet monthly to discuss business basics (like email newsletters), it is totally FREE, and it’s a great community for local creatives and small business owners! Catch up with our Morgantown/Fairmont group on Facebook. In addition to our local meetings, we often host some work sessions where we all get together and hash things out for our businesses. It’s often just the motivation one needs to get things done!
Finally, I’d love it if you join my 304 Collective email list. You’ll receive blog posts like this one right in your inbox, so you’ll never miss a tip from me (about once a month).


Leave A Comment
You must be logged in to post a comment.